

If you are building a new bathroom or remodeling an old one, one thing decides whether the project goes smoothly or turns into a headache: the plumbing layout hidden inside your walls and floor. This is where a bathroom plumbing rough-in diagram becomes your best friend. It shows exactly where the drain pipes, water lines, and vents need to go before any tile, drywall, or fixture is installed.
Many homeowners skip this step and trust guesswork, only to find out later that the toilet sits too close to the wall or the shower valve doesn’t line up with the showerhead. These small mistakes get expensive once the walls are closed up.
This guide breaks everything down in plain, simple language. You will learn what a rough-in means, standard measurements for toilets, sinks, tubs, and showers, common mistakes to avoid, and how building codes affect your layout.
What Does “Rough-In” Actually Mean

In plumbing, the “rough-in” stage happens after framing but before walls, floors, and fixtures go in. During this phase, plumbers install the drain, waste, and vent (DWV) pipes along with hot and cold supply lines. Nothing stays visible once the project is finished, but everything depends on these hidden pipes.
Think of it like a foundation. You cannot see it later, but if it’s off by even an inch, everything built on top of it will have problems. That’s why professionals work from a detailed plan rather than guessing pipe locations as they go. Getting it right the first time saves money, since reopening a finished wall to move a pipe costs far more than doing the layout correctly from the start.
Why You Need a Rough-In Diagram Before You Build
A rough-in diagram is a drawing that shows the exact placement of every drain, supply line, and vent for each fixture in the bathroom. It acts as a map that the plumber, tile setter, and cabinet installer all follow, so everyone’s work lines up perfectly.
Without a clear plan, different trades may guess at measurements, leading to mismatched holes, misaligned faucets, or a toilet that doesn’t sit flush against the wall. A good bathroom plumbing rough-in diagram also helps you pick fixtures ahead of time, since some toilets, tubs, and shower systems have unique spacing needs.
If you’re buying a new toilet, vanity, or shower system, always compare its installation sheet against your existing pipe locations. Keeping a copy of your layout on file also helps if you ever renovate again, since you’ll already know where everything sits behind the walls.
Standard Bathroom Rough-In Measurements at a Glance
Here is a quick reference chart of common U.S. residential figures. Always confirm exact numbers with your fixture’s spec sheet and local plumbing code.
Standard Rough-In Measurements by Fixture
| Fixture | Drain Location | Supply Line Height | Typical Clearance |
|---|---|---|---|
| Toilet | 12″ from finished wall to flange center | ~7″ high, ~6″ left of center | 15″ side, 21″–24″ front |
| Vanity/Sink | 18″–20″ from finished floor | 21″–23″ from finished floor | Varies by cabinet size |
| Shower | Centered in shower base | ~48″ valve height, ~80″ showerhead | 30″ x 30″ minimum interior |
| Bathtub | Per manufacturer spec sheet | ~28″ valve height | Per tub model and code |
Vertical Height Cheat Sheet (From Finished Floor)
| Component | Approximate Height |
|---|---|
| Toilet supply valve | 6″–7″ |
| Sink/vanity drain | 18″–20″ |
| Sink hot & cold supply | 21″–23″ |
| Tub spout | 4″ above tub rim |
| Shower/tub valve (standing shower) | 48″ |
| Showerhead outlet | 80″ |
| Grab bar blocking (accessible design) | 33″–36″ |
Toilet Rough-In: The Most Common Measurement
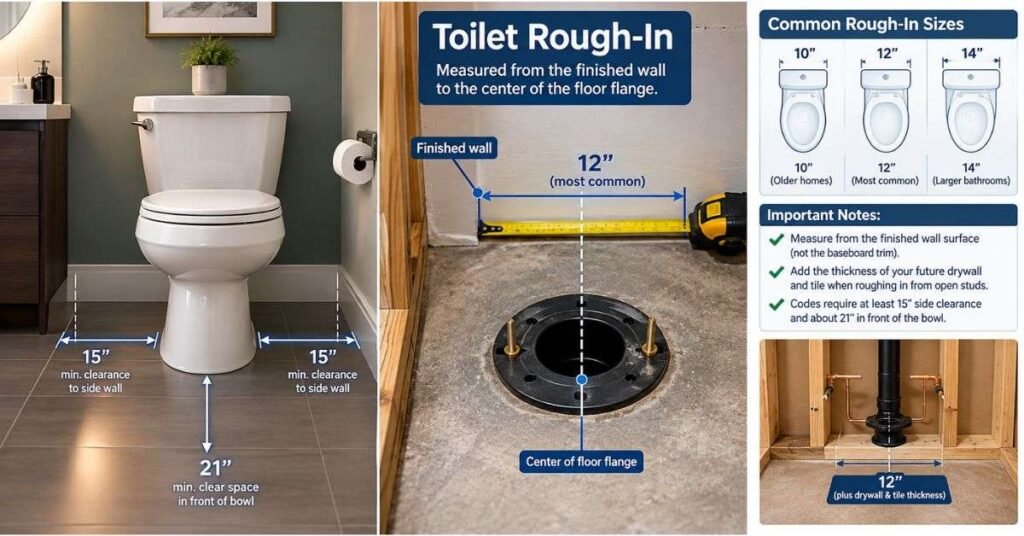
The toilet rough-in is measured from the finished wall behind the toilet to the center of the floor flange, where the closet bolts sit. This single number determines which toilets will physically fit in your bathroom.
A 12-inch rough-in is the most common size in modern homes and fits the widest range of toilet models sold today. Older homes sometimes have a 10-inch rough-in, while larger bathrooms occasionally use 14 inches. Always measure from the finished wall surface, not the baseboard trim.
Codes also require clearance space around the toilet for comfort and safety: usually at least 15 inches from the centerline to any side wall, and roughly 21 inches of open space in front of the bowl. When roughing in from open studs, remember to add the thickness of your future drywall and tile, since forgetting this step is a common reason toilets end up sitting slightly off from plan.
Sink and Vanity Rough-In Placement
Sink plumbing involves three connection points: the drain and two water supply lines. These should be centered under the sink bowl itself, not necessarily the middle of the vanity cabinet, especially with offset or double-bowl sinks.
For a standard vanity, the drain is typically placed 18 to 20 inches above the finished floor, while the hot and cold supply lines sit slightly higher, around 21 to 23 inches. Setting supply lines above the drain leaves room for the P-trap and keeps shutoff valves easy to reach later.
Horizontally, supply lines are often spaced about 8 inches apart, roughly 4 inches to either side of the drain center. Wall-mounted faucets are different and depend entirely on the manufacturer’s installation sheet, so always check that document before cutting into any wall.
Shower and Bathtub Rough-In Details
Showers and tubs have more moving parts than a simple sink, so precision matters even more. The drain, mixing valve, showerhead, and tub spout must all align, or the finished look will suffer once tile goes up.
For a standing shower, the mixing valve is usually set around 48 inches above the finished floor, while the showerhead sits around 80 inches high. For a tub-shower combo, the valve sits lower, closer to 28 inches, and the tub spout is placed about 4 inches above the tub’s finished rim. The shower drain is generally centered within the base so the floor slopes evenly toward it.
One frequent oversight is failing to align the valve and showerhead on the same vertical line. Marking a clear centerline on the framing before installing any pipe helps avoid this very visible mistake.
Drain Slope and Venting Basics

Good drainage depends on gravity, so pipe slope matters. Most codes require about a quarter-inch of fall per foot of horizontal drain pipe. Too little slope causes sluggish drains, while too much can let liquids run ahead of solid waste, causing clogs anyway.
Vent pipes are just as important, though often overlooked. Vents allow air into the drainage system, letting water and waste flow smoothly without gurgling sounds or sewer gas odors. Every fixture needs a properly sized vent according to your local code, and this information should appear clearly on your rough-in plans before any pipe goes in the wall.
Reading and Understanding Manufacturer Spec Sheets
Every toilet, tub, sink, and shower system ships with its own installation instructions, often including a printed drawing specific to that product, with drain centers, bolt patterns, and supply positions that may differ from generic averages.
Relying only on “standard” numbers can backfire with custom or imported fixtures. Before any wall goes up, gather the official installation sheet for every fixture and compare it against your bathroom plumbing rough-in diagram. Choosing products early gives your plumber accurate numbers instead of assumptions, preventing much of the rework seen in remodels.
Building Codes, Permits, and Accessibility Standards
Local plumbing codes govern almost every rough-in measurement, from pipe slope to fixture clearance, so check with your building department before finalizing any plan. Most U.S. jurisdictions base their rules on the International Plumbing Code or the Uniform Plumbing Code, sometimes with local amendments.
For bathrooms designed for accessibility, especially in public buildings, the Americans with Disabilities Act sets rules for clearances, fixture heights, and structural blocking to anchor grab bars safely. Review current requirements through the ADA’s official design standards before finalizing an accessible layout.
Water efficiency is another growing factor. The EPA’s WaterSense program offers guidance on fixtures that reduce water use without sacrificing performance, which can also affect supply line sizing.
Common Mistakes to Avoid When Planning Your Layout

Even experienced remodelers run into avoidable problems when they skip a proper plan. Here are the mistakes that show up most often when a bathroom plumbing rough-in diagram isn’t followed closely:
- Forgetting wall and floor thickness. Measuring from bare studs without adding drywall and tile thickness throws off the layout.
- Ignoring the product spec sheet. Assuming every fixture follows generic averages is risky with custom products.
- Skipping the vertical centerline. Misaligned shower valves and showerheads are obvious once tile goes up.
- Incorrect drain slope. Both too little and too much slope can cause clogs over time.
- Working from memory. Skipping a written plan is one of the fastest ways to introduce costly errors.
Taking a few extra minutes to verify measurements against your plan before drilling or cutting pipe almost always pays for itself later.
How to Build Your Own Bathroom Plumbing Rough-In Diagram
You don’t need to be a professional to sketch a basic layout before your plumber arrives, and doing so helps you ask better questions during planning. Start by drawing your bathroom’s footprint to scale, marking the location of each fixture.
Next, add the drain and supply line positions for every fixture using the standard measurements covered earlier, adjusting for any manufacturer spec sheets you’ve collected. Mark heights from the finished floor, not the subfloor, and note the horizontal spacing between supply lines clearly.
Finally, share this plan with your plumber, tile installer, and cabinet maker so everyone references the same numbers. For more detail on individual fixtures, see our related guides on toilet installation basics and choosing the right shower valve. A shared diagram keeps every trade aligned and cuts down on costly on-site guesswork.
Frequently Asked Questions
What is a bathroom plumbing rough-in diagram used for
It’s a drawing showing exact drain, supply, and vent locations so every trade installs fixtures in the correct place.
What is the standard toilet rough-in distance
Most modern toilets use a 12-inch measurement from the finished wall to the flange center.
How high should sink supply lines be roughed in
Typically 21 to 23 inches above the finished floor, with the drain slightly lower at 18 to 20 inches.
Can I change my rough-in plumbing during a remodel
Yes, but moving drains or supply lines usually means opening walls or floors and may need new permits.
Why does drain pipe slope matter so much
Proper slope, usually about a quarter inch per foot, keeps waste flowing smoothly and prevents clogs.
Final Thoughts
A well-planned rough-in is the foundation of a bathroom that works well for years to come. Once the drains, supply lines, and vents are placed correctly, everything else — tile, fixtures, cabinetry — falls into place far more easily. Skipping this step or relying on guesswork almost always leads to costly rework once the walls are closed.
Whether you’re renovating a small powder room or building a bathroom from scratch, take the time to measure carefully, gather manufacturer spec sheets, and keep a clear, written bathroom plumbing rough-in diagram on hand throughout the project. It doesn’t just prevent mistakes; it gives every contractor a shared reference point to work from.
If you’re starting your own project, sketch out fixture locations early and compare them against the numbers in this guide. If anything looks uncertain, a quick conversation with a licensed plumber before pipes go in the wall is always worth the small cost. For more planning tools, browse our bathroom remodeling resource hub to keep your project on track.