

If you’ve ever unwrapped a warm corn husk and found soft, fluffy masa dough hiding a savory filling inside, you already know why this dish has been loved for thousands of years. Tamales are one of the most comforting foods in Mexican and Central American cooking, and once you learn the basic steps, you can make them in your own kitchen with confidence.
I’ve made these corn parcels for family gatherings for over a decade, learning through trial, error, and a lot of help from older relatives who grew up making them by hand. This guide breaks the process down into small, easy steps so that even a first-time cook can follow along. You’ll learn what you need, how to build the masa dough correctly, how to fill and fold the husks, and how to steam everything until it’s soft and ready to eat.
By the end of this recipe, you’ll have a batch of homemade tamales that taste just as good — if not better — than the ones from your favorite local spot. Let’s get started.
A Quick Introduction to Tamales
At their core, these are little bundles of corn dough, called masa, wrapped around a filling and steamed inside a corn husk or banana leaf. The husk isn’t eaten; it just holds everything together while the dough cooks, sort of like a natural food wrapper. Once steamed, the dough turns soft, slightly sticky, and full of flavor.
This dish can be sweet or savory. Some are stuffed with shredded pork or chicken in red chile sauce, while others are filled with cheese and green chiles, beans, or even sweet fillings like pineapple or chocolate. Because the masa itself is fairly plain on its own, it acts like a blank canvas that takes on whatever filling and sauce you choose.
What makes this recipe so special is the texture. When done right, the dough should be light and a little fluffy — not dense or gummy. Getting that texture usually comes down to two things: whipping enough air into the fat before mixing, and using the right ratio of broth to masa harina (the treated corn flour used as the base).
This is also a food that brings people together. In many households, making a big batch is a group activity, with everyone taking a turn spreading dough, adding filling, and folding husks. It’s a slower style of cooking, but the payoff — a freezer full of ready-to-steam meals — makes the effort worthwhile.
The History Behind This Ancient Dish

This corn-based food is not a modern invention. According to research published by the University of Arizona’s Center for Latin American Studies, the tradition goes back thousands of years to early Mesoamerican civilizations, including the Maya, Aztec, and Olmec peoples, who relied on corn as a daily staple.
Corn was treated with a process called nixtamalization, which means soaking and cooking dried corn kernels in a lime-water solution. This step softens the corn, makes it easier to grind, and increases the amount of calcium and other nutrients your body can absorb. That same basic process is still used to make masa harina today.
Long before refrigerators or delivery apps existed, these corn dough parcels were a practical way to carry food. Wrapped in husks or leaves, they could be packed for travel, given as offerings during religious ceremonies, or shared at large family and community meals. Warriors and travelers relied on them because they stayed edible for several days without spoiling quickly.
When Spanish colonizers arrived in the 1500s, they introduced new ingredients such as pork, chicken, beef, and dairy, which were eventually folded into the fillings we recognize today. Over time, the dish spread and changed across different regions, with local versions popping up throughout Mexico, Guatemala, Honduras, Colombia, and other parts of Latin America — each with its own twist on filling, wrapping leaf, and sauce.
Ingredients You’ll Need
Before you start cooking, it helps to gather everything ahead of time since the process moves faster once your hands are in the dough. Below is a simple breakdown of what goes into the masa (dough) and a basic filling.
| Masa Dough Ingredients | Amount |
|---|---|
| Masa harina (corn flour) | 4 cups |
| Warm chicken or vegetable broth | 3 to 3½ cups |
| Lard or vegetable shortening | 1½ cups |
| Baking powder | 1 tablespoon |
| Salt | 1½ teaspoons |
| Dried corn husks | 20 to 24 pieces |
| Basic Pork Filling Ingredients | Amount |
|---|---|
| Pork shoulder, cooked and shredded | 3 cups |
| Red or green chile sauce | 2 cups |
| Garlic, minced | 2 cloves |
| Cumin | 1 teaspoon |
| Salt and pepper | To taste |
You can swap the pork for shredded chicken, beef, black beans, roasted vegetables, or cheese with strips of poblano pepper. If you’d like a milder sauce, our homemade salsa verde guide walks you through a simple version you can use here.
Equipment Checklist
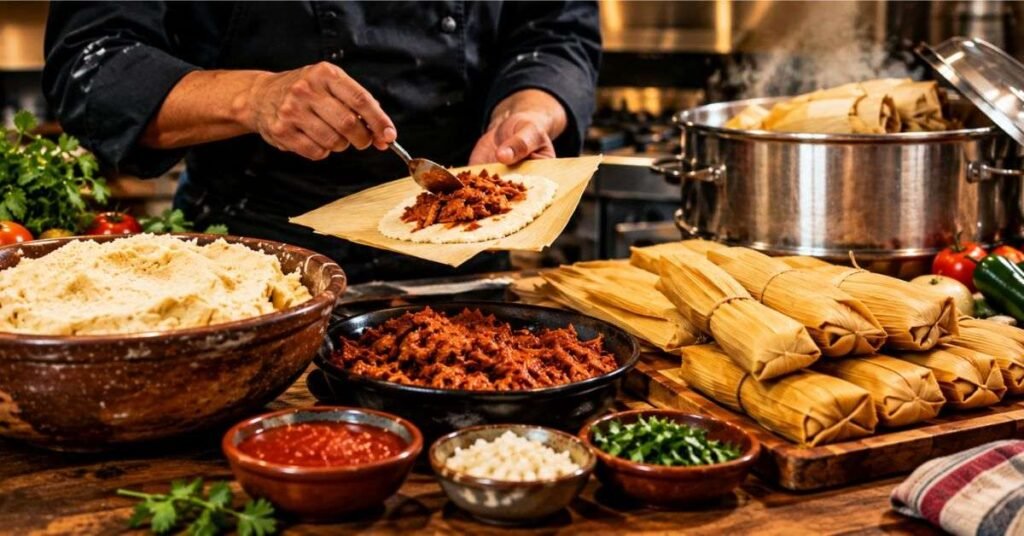
You don’t need anything fancy to make this recipe work, but a few tools will make the job much easier.
- A large steamer pot or tamalera — a tall pot with a perforated insert works best, but you can improvise one with a large stockpot and a metal colander.
- A stand mixer or hand mixer — whipping the fat properly is much easier with a mixer, though a sturdy wooden spoon and some arm strength will also do the job.
- A rubber spatula — for spreading the dough evenly on the husks.
- Small bowls — for keeping your filling, sauce, and softened husks organized as you assemble.
- Kitchen twine or thin husk strips — for tying the wrapped bundles closed, though this step is optional.
- A coin or small glass marble (optional but helpful) — many home cooks drop one into the steaming water; when it stops rattling, it’s a sign the water has run low and needs a refill.
Having your equipment and ingredients laid out ahead of time turns this from a stressful project into a smooth, almost meditative cooking session.
How to Make the Masa Dough
The dough is the heart of this recipe, so it’s worth taking your time here.
Soften the corn husks. Place them in a large bowl or sink and cover with hot water. Let them soak for at least 30 minutes, or until soft and pliable. Weigh them down with a plate so they stay submerged.
Whip the fat. Using a mixer, beat the lard or shortening on medium-high speed for about 3 to 5 minutes, until it looks light, pale, and fluffy — almost like whipped butter.
Mix the dry ingredients. In a separate bowl, whisk together the masa harina, baking powder, and salt.
Combine everything. Add the dry mix to the whipped fat in batches, alternating with the warm broth. Beat until the dough is smooth and slightly sticky, similar to a thick cake batter.
Test the dough. Drop a small spoonful into a glass of cold water. If it floats, the dough is light enough and ready to use. If it sinks, keep beating for another minute or two.
This whipping step is the single biggest reason homemade dough sometimes turns out dense. Don’t rush it — the extra air you beat in is what gives the finished product its soft, pillowy texture.
How to Prepare the Filling
While the dough rests, you can prepare your filling so everything is ready to assemble at the same time.
Cook the meat. If using pork, chicken, or beef, simmer it in water with garlic, onion, and a pinch of salt until it’s fully cooked and tender enough to shred with two forks.
Shred the meat. Once cooled slightly, pull it apart into small, bite-sized pieces.
Make or warm your sauce. Whether you’re using a red chile sauce, green tomatillo sauce, or a mole-style sauce, warm it in a pan over medium heat.
Combine. Stir the shredded meat into the sauce until every piece is coated. Taste and adjust the salt, garlic, or spice level to your liking.
Cool slightly. Let the filling cool a bit before assembly so it doesn’t melt the dough when you spread it inside the husk.
For a vegetarian version, swap the meat for black beans, roasted corn, or sautéed mushrooms mixed with the same sauce base. The method stays exactly the same — only the filling changes.
How to Assemble and Wrap Tamales
This is the step where the process starts to feel real, and it’s also the most hands-on part of the recipe.
Pat the husks dry. Take a soaked husk and shake off the extra water.
Spread the dough. Using a spatula or the back of a spoon, spread about 2 to 3 tablespoons of dough in a thin, even layer across the wider end of the husk, leaving a small border on the sides.
Add the filling. Spoon 1 to 2 tablespoons of filling down the center of the dough.
Fold the sides in. Bring the long sides of the husk together so the dough wraps around the filling, then fold the empty pointed end up and under.
Repeat. Continue until all your dough and filling are used. This is when you’ll finally start seeing the tamales take shape as a stack of neat little bundles.
Stand them upright. As you finish each one, stand it open-side up in your steamer basket, leaning against the others for support.
If a husk tears, don’t worry — you can patch it with a second small piece, or simply use it as an extra wrap around a finished bundle for reinforcement.
How to Steam Them to Perfection

Once everything is wrapped, it’s time for the final cooking stage.
Set up your steamer. Add a few inches of water to the pot, making sure the water level stays below the steamer basket so it doesn’t touch the food directly. Drop in a coin if you’re using one to track the water level.
Load the pot. Arrange the bundles standing upright, open-end facing up, packed snugly so they support each other but still have a little breathing room.
Cover loosely. Place a layer of extra husks or a damp towel over the top before covering with the lid. This traps steam and keeps moisture from dripping directly onto the food.
Steam low and slow. Cook over medium-low heat for about 60 to 90 minutes. Check the water level every 20 to 30 minutes and top it up with hot water as needed.
Test for doneness. The dough is ready when it pulls away cleanly from the husk. If it still sticks, reseal and steam for another 10 to 15 minutes.
Rest before serving. Let everything sit for about 10 minutes after steaming; the dough firms up slightly as it cools, making it easier to unwrap and eat.
Nutrition Facts and Health Benefits
Because the base ingredient is corn masa, this dish naturally contains complex carbohydrates, some protein, and — depending on the filling — a good amount of fiber. According to nutrient data from the U.S. Department of Agriculture, masa harina made from corn flour treated with lime provides roughly 376 calories, 8 grams of protein, and around 82 percent of its calories from carbohydrates per 100 grams.
| Nutrient (per average serving, pork-filled) | Approximate Amount |
|---|---|
| Calories | 220–280 kcal |
| Protein | 8–10 g |
| Carbohydrates | 22–26 g |
| Fat | 10–14 g |
| Fiber | 2–3 g |
| Calcium | Higher than plain corn flour, due to nixtamalization |
Because the corn used is treated through nixtamalization, it offers more usable calcium and B vitamins than untreated corn flour. You can make a lighter version by using less fat in the dough, choosing lean fillings like chicken breast or beans, and adding roasted vegetables for extra fiber. Portion size matters too — a single serving is usually one to two pieces, paired with a side salad or vegetable broth soup to round out the meal.
Storage, Freezing, and Reheating Tips
One of the best things about making a big batch is that leftovers store and reheat beautifully.
- Refrigerator: Once cooled, wrap tightly and store in the fridge for up to 3 to 4 days. This lines up with general food safety guidance from the USDA’s Food Safety and Inspection Service on how long cooked leftovers stay safe to eat.
- Freezer: For longer storage, freeze them (still in their husks) in a sealed freezer bag for up to 3 months. Label the bag with the date so you know when to use them by.
- Reheating from the fridge: Steam for about 15 minutes, or microwave individually wrapped in a damp paper towel for 60 to 90 seconds.
- Reheating from frozen: Steam for about 25 to 30 minutes without thawing first, or thaw overnight in the fridge and then steam for 10 to 15 minutes.
- Safety tip: Always reheat to a steaming-hot internal temperature before eating, and avoid leaving cooked food sitting out at room temperature for more than two hours, following general leftover safety guidance from FoodSafety.gov.
If you’re planning a larger gathering, our guide to building a full Mexican dinner menu has extra side dish ideas that pair well with this main course.
A few quick pairing ideas round out the meal nicely: Mexican rice (see our step-by-step Mexican rice recipe), refried beans, a fresh pico de gallo, or a warm cup of consommé. For a festive touch, top each unwrapped bundle with crema, crumbled cheese, and chopped cilantro.
Frequently Asked Questions
Can I make tamales ahead of time
Yes. You can assemble them a day ahead and refrigerate unsteamed, or steam and freeze them fully cooked for later.
Why is my dough falling apart
It usually needs more fat, more broth, or a longer whipping time to trap enough air for a stable, spreadable texture.
Can I use banana leaves instead of corn husks
Yes, banana leaves work well and are traditional in several regions, giving a slightly different, earthier aroma.
How do I know when they’re fully cooked
The dough should pull away cleanly from the husk without sticking; if it sticks, steam for a few more minutes.
Are they gluten-free
Traditional masa harina made from corn is naturally gluten-free, but always check the package label for cross-contamination warnings.
Final Thoughts
Making tamales from scratch takes some patience, but it’s a rewarding project that pays off in flavor and in the memories made along the way. Once you understand the basic rhythm — whip the dough, prepare the filling, spread, fold, and steam — the process becomes much less intimidating, and you’ll likely find yourself making bigger batches each time.
This recipe is meant to be a flexible starting point. Swap in the fillings your family loves, adjust the spice level, and don’t be afraid to ask for help around the table; this is a dish that has always been made better by extra hands. Whether you’re cooking for a holiday, a Sunday family dinner, or simply craving something warm and homemade, this recipe will get you there.
Give this recipe a try this week, and don’t forget to save your favorite filling combination for next time. If you make a batch, consider freezing half so future-you has a comforting, ready-to-steam meal waiting on a busy day.